Saturday, April 14, 2018
Thursday, April 12, 2018


Wednesday, April 11, 2018
Working on the CCR
During this last week, I have been working on my CCR since I have finished my magazine. I found that the questions posted are the rubric are very easy to incorporate in a normal conversation. To make my CCR less boring, I want to do a screen-recording showing all my progress while I talk. I have done some research by looking at past students CCR and this was the one that appealed the most to me. I started googling ways to screen record and I found a lot of gaming apps that gives the option to screen record. Apparently, all windows 10 computers come with the Xbox app and that has this feature. I watched a lot of videos in youtube to see how this works and I am not 100 percent sure that it's going to work. However, my mom is an engineer and works at a software company and she knows how to play around with it. My plan is to line up all the links that I want to show in the video, like my blog, final project, and other websites that I used to make the final product, and show them in order to show the steps i did for this project. I have answered all the questions and did my script. It's weird to think that this project is going to end but I am happy with my final project.
Sunday, April 8, 2018
Final touches
After what feels like 100 years, I have finally finished my magazine. I am very proud of it but I am not going to lie it took a lot of effort and dedication. Last class was our last group meeting and I loved them. I loved being able to help people out and give them criticism from a fresh set of eyes. And in return they did the exact same for me. I went into class that day struggling because I could not figure out where to place the content on my two page spread to make it flow. However, they gave me the idea of putting all the pictures on one side and the materials on the bottom of the page with the steps on the left. After I played around with it for a while, I think I finally found the perfect spot to place everything. This is how it looks:


Some final touches I made to the magazine was I added the page number to all the pages, I made the Masthead look 3D by layering the title two times and by strategically placing one on top of the other to make it look like there is a shadow, and i retook the picture for my two page spread because it was horizontal before and not vertical so it did not fit. I also added numbers to the pictures to make it easier for the readers to follow along. Now all that is left to do is the CCR and I am going to start on that right away!
Thursday, April 5, 2018
Finished string art
Today when I got home from school, my friend came over to help me take the final pictures. Last class, I talked to the teacher because I was having difficulties finding a place to put my cover lines and she suggested that I take another picture for my cover page that showed the room in a different angle. So when I got home I had to prepare the living room again and I got these shots from the different angles:


The only thing that I am having trouble with now is trying to fit everything on two pages because my partner did one full page of a picture and on the other page she did all the materials,steps, and pictures. However, I have more steps in my project than she does and I have more pictures so I need to see how I am going to fit everything which is kind of stressing me.


With these new pictures it was a lot easier to find a place to put my cover lines. The next thing that I did was finish my string art. It was a lot easier the second time around which made me relieved. During the time I was doing the project i was also taking photos to add to my magazine. Out of all the shots these were the ones that came out the best:


The only thing that I am having trouble with now is trying to fit everything on two pages because my partner did one full page of a picture and on the other page she did all the materials,steps, and pictures. However, I have more steps in my project than she does and I have more pictures so I need to see how I am going to fit everything which is kind of stressing me.
Tuesday, April 3, 2018
Its coming along!
I am excited to say that the magazine is finally coming along. I started the cover page and the table of contents. I still have some doubts about the cover page. And I also had troubles with the website I was using. So I am going to explain everything in depth.
First, I had to switch from joomag to canva and lost most of my project. I had made an account with joomaga long time ago so I could not use my email anymore for the free trial. This was not a big deal because I just switched over ton my mom's email. However, the website does not allow me to sign on anymore because it says that my account has not been approved. This took me a bit by shock but I'm just glad that this happened now and not the week that the project was due. So after this I just switched gears and started using canva. Surprisingly, I really enjoy using canva. I find it a lot easier to use and I feel more secure that I will not lose all my progress but just to be safe I downloaded it to a pdf.
The first thing that I had to do when starting the cover page was that I needed to edit my main picture to make it brighter. I used the app snapspeed and it worked like a charm. I put the title in the mass head but I felt that it blended in too much with the background so I looked at some images on google and saw that some magazines add a type of color block behind the title to make it pop more so that is exactly what I did. I chose a bluish green to match the color scheme that I had going on with the pillows on the couch. The only thing that I am struggling with on my cover page is where to place the cover lines. I don't know where to put them so they don't look awkwardly placed. I am going to ask for my partner's opinion on that tomorrow. This is the first draft of my cover page:

The next thing that I worked on was the TOC. I did not want to add a picture like the one one the cover page for this and I did not want to have a simple solid background. So what I did was I took a picture of a pillow that I have which has a really cool design and I used that as my background and I must say that it came out really cool. This is how I did it:

Sunday, April 1, 2018
Content for the magazine
On my flight back from New York, I had some spare time and I decided to write the content for the cover lines, the table of contents, and the two page spread. Fortunately, I got it all done! I tried to use a lot of numbers and empowering words in the cover lines like "spice up" and "20 new ideas". I looked at examples of other magazines and this is what they did the most.
These are my draft cover lines:
- 20 cheap ways to spice up your living room
-DIY summer fllower arrangement
-say goodbye to boring string and hello to string art
-top 10 trending DIY projects
This is the draft for the TOC:
-DIY Flower arrangements
-Step by step DIY string art
-20 cheap ways to spice up your living room
-tips for adding a pop of color in the living room
-statement DIY projects to make others drool
Draft for 2 page spread:
Materials: a slab of wood, hammer,nails,string or yarn, template, tape, and scissors.
1: place the Wooden slab on a flat surface and tape the edges of the template onto it
2: outline the design using the nails. Hammer each nail individually leaving an inch in between each
3: once the outline is complete, remove the template by ripping the paper
4: now it is time to begin using the string. Make a small knot around a nail. This will be your starting point.
5: next you will want to make a zig zag design around all the nails. Make sure to go wrap all the way around every nail.
6: once you have created the design, cut the remaining yarn or string and make another knot.
7: repeat these steps for the two other arrows
8: hang your masterpiece in the living room and observe its beauty!
At school I will talk to my partner and ask for her opinion on these but I believe this is a good start.
Thursday, March 29, 2018
String art is hard!
Today I started my DIY project and it was an experience. I found out that it requires A LOT of patience and skill to do string art. I think I went into it thinking that it was gong to be super easy because I had seen so many videos and felt prepared but that was not the case. I started by gathering all the material needed for the project. When I got those, I took a picture of them to add it to my two page layout. Next, I printed out a template of my design. The first design I chose to do was the word "hello" on a wooden board. I started to do the project and quickly learned that it was a very complex design. The space in the letters was too narrow so it was hard to nail down the nails so they kept falling off. That drove me insane and I decided that it would be better to do another design. So after an hour wasted it was back to the drawing board. I googled "string art templates" and I found a really cool one. It was three arrows and they were all different colors. This was the new template:

Even though this wasn't my first choice, I think it will look even cooler. Also, these were a few of the pictures that I took before I switched gears:


I have already started on the arrow string art and I am done with one of the arrows. I think I can finish the other two quickly and then I can begin to assemble everything onto the magazine.
Tuesday, March 27, 2018
Photoshoot time
Today was such a productive yet stressful day. It all started when i started preparing my living room for the picture. At first I was really concerned that I was not going to be able to get a good picture for my cover page, so I google some tips for taking photos of rooms. It said that I needed to use a tripod to get a picture that was centered and that lower angles were better when taking these types of picture. After reading these tips I took on the challenge. It was hard to find items around the house that would give the picture a bit of life and color because the wall and the sofa were both white. Therefore, I scavenged around my room and took the colorful pillows from the photo downstairs. I also had many decorations from my fifteenth birthday party that were used like the candle in the middle and the "art" on the wall is made of plastic and is usually used and plate settings. I needed to add something on the wall or else the couch would blend in too much and there would be no contrast. Another problem that I had was that the windows were facing towards the camera so it was kind of hard to make the picture brighter. I had to use snapspeed which is an editing app to get the photo looking brighter. It took me a million tries to get the photo but in the end I finally did it so here it is:
 I think that the picture came out really good and there is a lot of space to write the title and the cover lines without blocking the main focus of the picture.

Sunday, March 25, 2018
Preparing for a long and busy week
I have some big plans for this week regarding the magazine. I plan on starting to take pictures on Tuesday. My friend has agreed to help me because I need someone to be like a hand model for me. I want to show pictures of the steps needed for the project but I can't show the hand movements and take the pictures at the same time. On that same day I hope to buy all the materials needed and I also want to be able to take the picture for my cover page too. I am going to create a set in a spare room that I have downstairs so I can change it however I want. Also, I found this really cool light at Walmart that I think would make the pictures look a lot better and brighter. It is an LED light fixture with an aluminum umbrella that reflects the light to give it a natural lighting.
If I am able to get all of this done I will be extremely happy because I will have the rest of the week to layout my magazine on joomag. However, I am a bit scared to start working with that program. My partner, Hannah, got her whole project deleted. Apparently she was only on a temporary free trial and to continue with her project she would have to pay a monthly fee. She was able to contact the workers of the magazine and got her trial extended. I am not sure now if we should continue with joomag or if we should switch back to canva but I am waiting for school to start again so I can talk to my teacher about it.
If I am able to get all of this done I will be extremely happy because I will have the rest of the week to layout my magazine on joomag. However, I am a bit scared to start working with that program. My partner, Hannah, got her whole project deleted. Apparently she was only on a temporary free trial and to continue with her project she would have to pay a monthly fee. She was able to contact the workers of the magazine and got her trial extended. I am not sure now if we should continue with joomag or if we should switch back to canva but I am waiting for school to start again so I can talk to my teacher about it.
Wednesday, March 21, 2018
Tour around A.C. Moore
Today I decided to go to A.C. Moore and look at the materials that I will need to do my DIY string art project. I have been watching a lot of videos on youtube recently in preparation. When I got to the craft store, I had two materials in mind that I knew would be essential for this project. The first was the board that the string art is going to be made on. This is basically a slab of wood that has been sand down. At first, I was not sure if i was going to be able to find it at a craft store but my backup plan was to go to home depot which sells constriction products. However ,that was not needed because I quickly found what I was looking for. There was such a variety which made me excited because I was able to picture my final design on all of them. Some of the ones I liked the most were:


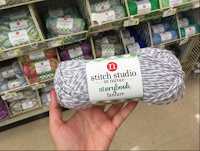
The next item that i needed to look for was yarn. When I got to the knitting section, I was overwhelmed with the amount of colors they had. They had every color of the rainbow plus some with different designs. I am still not set on a specific color but one pattern that really spoke to me was this one:

- I thought this one would look really cool if I stain the wood so it can have that darker, rustic look to it.

- This is the exact same wood board from the video from my blog post. I really like this one because it's unique and I think this might be my favorite one.

- This one also has a unique shape but it is still very simple. However, it is a larger board which would give me more space to do the art and I could make a bigger design.
The next item that i needed to look for was yarn. When I got to the knitting section, I was overwhelmed with the amount of colors they had. They had every color of the rainbow plus some with different designs. I am still not set on a specific color but one pattern that really spoke to me was this one:

I am actually really excited to start and this is what I will be working on during break.
Tuesday, March 20, 2018
Starting the first draft
Last class Hannah and I oficially started the magazine making process. We began by using canva to start on the masthead of the magazine. We centered the title, "THE STITCH", and we began looking at the fonts that we had already chosen before. However, none of them appealed to us that much anymore. I think it was different this type when we saw the fonts because with the lettering of our title it looked awkward. We had a mini panic attack and quickly switched gears to joomag.
The first time we tried to use joomag, we found it to be extremely confusing and overwhelming. But this time when we logged on, we found tutorial videos explaining how to use the website. That was our saving grace because everything became so much clearer. We watched a few of the videos in class that explained how to use the text boxes and the sizing. After a few minutes of being enlightened, we decided to try it for ourselves. After playing around for a bit we started to get the hang of it. The variety of fonts on joomag was much wider than on canva which appealed to us. The only problem that we had on the website was that we were not able to make the font a solid color. We were able to get a border on it but the middle part was not filled in. We do not know how to fix this but I know that next class we will be able to figure it out.
The first time we tried to use joomag, we found it to be extremely confusing and overwhelming. But this time when we logged on, we found tutorial videos explaining how to use the website. That was our saving grace because everything became so much clearer. We watched a few of the videos in class that explained how to use the text boxes and the sizing. After a few minutes of being enlightened, we decided to try it for ourselves. After playing around for a bit we started to get the hang of it. The variety of fonts on joomag was much wider than on canva which appealed to us. The only problem that we had on the website was that we were not able to make the font a solid color. We were able to get a border on it but the middle part was not filled in. We do not know how to fix this but I know that next class we will be able to figure it out.
Sunday, March 18, 2018
Speaking to an experienced string artist
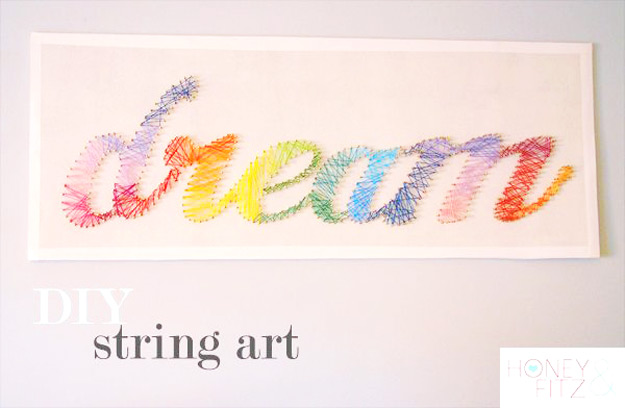
In my last post, I mentioned how I got inspiration for the string art DIY project from my friend's masterpiece that she made. Since that first time is saw it, I became been intrigued so I decided to call her and ask her a few questions about it. She was more than happy to give me some tips and she invited my over so I could get a closer look. The art piece in her room is a multi-colored wave.

I started of by asking her how long it took her to produce the final product. She said it took her three days but she took breaks in between and she said that depending on the size of the artwork it could take a lot less time. Another thing that I was interested in knowing was if a specific type of string needed to be used and what type she had used. She told me that she used yarn because it was the one she was most comfortable with but she said that it could also be done with synthetic nylon. She also gave me the following tips to help me create the best artwork:
-Take your time while doing it, every movement is important and it can go downhill very fast.
-Make sure to tie the knot on each pin very securely because if not the whole art work can be destroyed.
-Try finding a template online for the design because it will be easier for the layout,
I was very grateful for her willingness to help me and I felt that after that conversation I am ready to start.
This was her finished artwork:

Thursday, March 15, 2018
String art
Today in class we had our first group critiques and I honestly have to say that it was an amazing experience. Everyone in the group left with new insights and ideas that would benefit them in the long run. During the group critique, I tried to specify in more detail my issue for the magazine. I explained that I was doing home improvement for the living room while my partner is doing the bedroom. I explained that for the pictures, I have a spare room downstairs that is completely empty so I can build up my set from scratch.
During the group critique I also explained the project that I wanted to create for my two page spread which is string art. String art is basically getting a slab of wood, nails, and yarn to create a design. The outcome is beautiful but it might be a challenging project but I am all for it. I have always admired this type of art since the first time I saw it at my friends house. I am currently in between two designs, a house with the words home sweet home on the bottom or the word hello. I feel like both those designs are very cozy and are good for home decorations. I will probably buy a piece of light wood at office depot and get either white or pink yarn. The color depends on the rest of the props that I add to the set. I found some videos on youtube describing the process. I plan on buying the materials this weekend and in the beginning of next week I will start to create my set. This is finally happening and I am ecstatic.
Wednesday, March 14, 2018
The big reveal
I am very excited to say that after what feels like a million years, my partner and I have decided on a name for our DIY magazine. And the name is... The Stitch! I am so thrilled with the name and I think if fits the genre of the magazine perfectly however it was not an easy journey.
As I stated in my blog post last week, my partner and I were having a really hard time deciding names for our magazine. We would come up with really good ones but, in the end, they were always taken. Also, we became really good at creating names for magazines of other genres. For example, we came up with the name Swatch for a makeup magazine or Feline for a fashion magazine but we had already set out hearts on DIY so there was no turning back. Though last weekend, my partner texted me one afternoon asking me what I thought of the name The Stitch. I instantly fell in love and I knew we had done it. The next thing we had to do was research if the name was already taken. This was our biggest enemy because every name we came up with seemed to be taken. But, we struck gold with this one. It was completely unique and that made me even happier.
The reasoning behind the title is because there is a common term, "sitch", that is used when a person wants to find out more about a situation and we wanted to do a play on that word. So, instead of "sitch" as in like gossip and news its "Stitch" as in new things craft and DIY. I even thought we can add the phrase "What's the Stitch?" somewhere on our cover page.
I am overjoyed that we got our name and i'm ready for the next steps.
Sunday, March 11, 2018
Fonts, Fonts, and more fonts
This week was a very productive one for my me and my partner. The last time we met up we discussed a variety of things from layout to fonts for the title and the headlines. We also began to research different magazine websites that we can use to create our final project. So here it goes.
We began our "meeting" by finishing the layout of our magazine. Last blog post I presented a rough draft of it and I talked about the different aspects that we wanted to include in each section but I think we finally have the final layout. Of course, through out the journey bits and pieces are going to be moved around but it is nice to have a baseline. The shaded regions of the layout are meant to represent where the pictures will be placed. Those are the main focuses of the page but we would also like to have delicate details going around the border like a small scissor making a designs all around. We also included the lines to direct how the readers should confront the pages.


Another topic that my partner and I focused on was the website that we are going to use to make the magazine. I had already been exposed to the website canva because of a former project but I found it a bit hard to use. Every movement that had to be made was very tedious and that drove me insane at some points. Therefore, we asked our teacher if she had any recommendations of websites to use and she indicated joomag. Neither one of us had used the website before and when we attempted we found it to be very intimidating. There were a lot of buttons and we did not know what any of them did. so in the end we decided to use canva because it is a good website I just need to practice and learn all the tricks to it.
Once we decided the platform we started working. The first thing we did was test out some fonts on a draft magazine to see which one we liked the best. Canva has so many options that this was a bit hard for use because we are both indecisive. We picked our top five and here they are:

My favorite one of the five is Emilys Candy. I find that one to be very girly and fits out target audience the best. However, I am not sure that will be the best one to use for our title. For the title, I was picturing a font that was very bubbly and light. I do not think that these met that expectation but I am willing to keep looking to find the perfect font.
Wednesday, March 7, 2018
Starting the creative process
Monday marked the first official day that my partner, Hannah, and I started brainstorming ideas for our DIY magazine. Now in the beginning it was a bit nerve wrecking because it seemed like an overwhelming amount of stuff needed to be done, but as we started to schedule out out the process, my anxiety decreased.
We began by focusing on the cover page of the magazine. We both agreed that the title of the magazine should be front and center on the top of the magazine. We also decided that we want the font of the title to have rounded edges and a bubble look rather than straight ,geometrical lines. Now this was just a simple brainstorm of the font but we will be going into greater depth on that this week. One thing that I believe to be fundamental when creating this magazine is choosing a distinct color scheme. Since our target audience is women from the ages of 18-35, we decided to uses colors such as white, pink, and a marble print. This gives the magazine a pop of color but it also makes it slick with the white finishes. The main image will be a set that we arrange to make it look like a bedroom and we will include the DIY projects that we create. On the cover lines, we intend to use a lot of numbers and lists because that is what draws people in.
The table of contents was and still is my main worry. We wanted to create a very abstract table of contents with DIY instruments in the background like scissors, tape, paintbrushes, etc. The table of contents will follow the same color scheme as the cover page. We decided that we want to make the table of contents two pages because there are so many things that can be included in a DIY magazine that one page just isn't enough!
The two page layout is what I am most excited about. We wanted to do one page where we describe and lay out the steps for a DIY project and we want to display the picture on the top half of the page. We have not decided what this specific art project is going to be but I have been getting a lot of amazing DIY ideas from this YouTube channel called Mr. Kate. She is an interior designer and she focuses a lot on DIY projects on every room she does. For the second page, we want to do a list. Now this list might have include top DIY projects for the summer or fun things like that. We have not set that in stone.
Here are some extremely really rough drafts that we created in class:


Now everything discussed on this blog post are my hopes and dreams for our magazine and if we are ably to depict what I vision in my mind that that would make me exceptionally happy.
Sunday, March 4, 2018
Channeling my artistic side
Now that I have a strong basis for my topic with the research that I have done, I began researching DIY projects that my partner and I can attempt for the content of the two page layout. This will help me better understand the route that I want to take for the magazine. For example, do I want to just focus on bedroom improvement or do I want to give tips for the whole house? Or do I want to emphasize more on the backyard than inside the house? To make it easier I researched each subtopic individually.
Bedroom DIYs:
-Door decorating. This is when you take duck tape and cut it into geometrical shapes and make a design with it on your bedroom door. This gives the room a bohemian look and it is something unique that a lot of people don't see.

-DIY string art sign. This is a really cool and inexpensive way to add an art piece to the bedroom. All that is needed is a board, some pins, and string.
Home improvement: (this is the one I am least interested in)
-Mason jars. Mason jars have many purposes and recently they have been used for home decor. One project that can be done with mason jars is using them as plant holders and designing them however you want.

Garden:
-Hanging garden tins. These tins are a good way to incorporate flowers into the back yard and it gives the home a cozier feeling once they are hung on the fence.

-Up-cycled container garden. This project kills two birds with one stone. It helps get rid of all the junk in a persons house by refurbishing it into a designer look.

By doing research on these DIY projects it helped me narrow my focus to bedroom decor. This does not mean that the whole magazine will focus on this but the issue that we plan to create will have a large sum of bedroom improvement ideas. Also, I can incorporate some of the other projects into a bedroom setting which will make it even more unique.
work cited
S. (2017, September 15). 37 Insanely Cute Teen Bedroom Ideas for DIY Decor | Crafts for Teens. Retrieved March 04, 2018, from http://diyprojectsforteens.com/diy-teen-bedroom-ideas/
Best 25 Mason jar crafts ideas on Pinterest | Mason jars, Mason jar diy and Mason jar projects. (n.d.). Retrieved March 04, 2018, from https://www.pinterest.com/explore/mason-jar-crafts/
24 DIY Garden Projects Anyone Can Make. (2014, August 18). Retrieved March 04, 2018, from https://bestplants.com/24-diy-garden-projects-anyone-can-make/
Bedroom DIYs:
-Door decorating. This is when you take duck tape and cut it into geometrical shapes and make a design with it on your bedroom door. This gives the room a bohemian look and it is something unique that a lot of people don't see.
-DIY string art sign. This is a really cool and inexpensive way to add an art piece to the bedroom. All that is needed is a board, some pins, and string.
Home improvement: (this is the one I am least interested in)
-Mason jars. Mason jars have many purposes and recently they have been used for home decor. One project that can be done with mason jars is using them as plant holders and designing them however you want.
Garden:
-Hanging garden tins. These tins are a good way to incorporate flowers into the back yard and it gives the home a cozier feeling once they are hung on the fence.
-Up-cycled container garden. This project kills two birds with one stone. It helps get rid of all the junk in a persons house by refurbishing it into a designer look.
By doing research on these DIY projects it helped me narrow my focus to bedroom decor. This does not mean that the whole magazine will focus on this but the issue that we plan to create will have a large sum of bedroom improvement ideas. Also, I can incorporate some of the other projects into a bedroom setting which will make it even more unique.
work cited
S. (2017, September 15). 37 Insanely Cute Teen Bedroom Ideas for DIY Decor | Crafts for Teens. Retrieved March 04, 2018, from http://diyprojectsforteens.com/diy-teen-bedroom-ideas/
Best 25 Mason jar crafts ideas on Pinterest | Mason jars, Mason jar diy and Mason jar projects. (n.d.). Retrieved March 04, 2018, from https://www.pinterest.com/explore/mason-jar-crafts/
24 DIY Garden Projects Anyone Can Make. (2014, August 18). Retrieved March 04, 2018, from https://bestplants.com/24-diy-garden-projects-anyone-can-make/
Saturday, March 3, 2018
The start of something big
Now that I have already introduced myself, lets jump right in to the creative process of designing a magazine. The part that I was most stressed about for this project was choosing a magazine genre. However, after meeting up with my partner, we decided that we wanted to create something unique and that most people our age do not delve into. This is why we decided to do a Do It Yourself (DIY) Magazine. When we saw examples of these magazines our faces lit up. We had already started talking about the different aspects that we can incorporate into the magazine and all the fun DIY projects that we can make to include in the two page layout. But before we could make this our final decision, I had to do some research.
DIY is understood as the task of creating things by yourself. For example, it can be a table or painting that a person built or drew by themself and it is usually used for home improvement. The target audience for this type of magazine is middle class women in the age range of 18-35 year old.
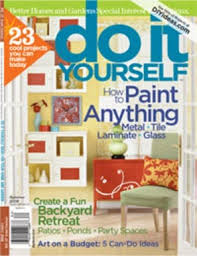
When I began my research for this topic, two magazines captured exactly what I want my magazine to embody. The first one is the magazine Do-It-Yourself. This magazine is distributed quarterly and it includes step-by-step instructions, photos of the final project, and diagrams so the readers get a clear understanding of the process. On thing I noticed about DIY magazines is the lighting. All of the magazines have a picture on the cover page that uses high key lighting and looks very heavenly. Also, there are accent colors that contrast with the background to make a statement. This specific magazine also does that for its cover page. This magazine also gave me ideas about what I can write my two page layout about. Some ideas I got were: try-it-yourself section, tips , What to do with..., and many more.
Another magazine that I came across while doing my research was Wedding DIY. This magazines distributes issues about tips in making a cheaper and prettier wedding with the help of DIY . Now my partner and I do not want to focus solely on weddings, but the cover page of this magazine really appealed to me. It was less hectic and crammed than the other magazine which I believe looks better. I think if my partner and I include aspects of both cover pages of the magazines, then we can create the ideal finished look.

Even though this is just the beginning of a long journey of research, I am excited and happy with the way things are looking for this final portfolio project!
Work cited
Do-it-Yourself Magazine. (n.d.). Retrieved March 03, 2018, from https://www.magazines.com/do-it-yourself-magazine.html#tab1
H. (2018, January 14). Homebut.com. Retrieved March 03, 2018, from http://homebut.com/blog/fincube-a-brilliant-modular-home/
Home Improvement Magazines. (n.d.). Retrieved March 03, 2018, from http://www.allyoucanread.com/home-improvement-magazines/
DIY is understood as the task of creating things by yourself. For example, it can be a table or painting that a person built or drew by themself and it is usually used for home improvement. The target audience for this type of magazine is middle class women in the age range of 18-35 year old.
When I began my research for this topic, two magazines captured exactly what I want my magazine to embody. The first one is the magazine Do-It-Yourself. This magazine is distributed quarterly and it includes step-by-step instructions, photos of the final project, and diagrams so the readers get a clear understanding of the process. On thing I noticed about DIY magazines is the lighting. All of the magazines have a picture on the cover page that uses high key lighting and looks very heavenly. Also, there are accent colors that contrast with the background to make a statement. This specific magazine also does that for its cover page. This magazine also gave me ideas about what I can write my two page layout about. Some ideas I got were: try-it-yourself section, tips , What to do with..., and many more.
Another magazine that I came across while doing my research was Wedding DIY. This magazines distributes issues about tips in making a cheaper and prettier wedding with the help of DIY . Now my partner and I do not want to focus solely on weddings, but the cover page of this magazine really appealed to me. It was less hectic and crammed than the other magazine which I believe looks better. I think if my partner and I include aspects of both cover pages of the magazines, then we can create the ideal finished look.
Even though this is just the beginning of a long journey of research, I am excited and happy with the way things are looking for this final portfolio project!
Work cited
Do-it-Yourself Magazine. (n.d.). Retrieved March 03, 2018, from https://www.magazines.com/do-it-yourself-magazine.html#tab1
H. (2018, January 14). Homebut.com. Retrieved March 03, 2018, from http://homebut.com/blog/fincube-a-brilliant-modular-home/
Home Improvement Magazines. (n.d.). Retrieved March 03, 2018, from http://www.allyoucanread.com/home-improvement-magazines/
Wednesday, February 28, 2018
Take One!
The big day is finally here! We have waited all year for this and today, February 28, 2018, we officially begin our final portfolio project. I am overwhelmed with curiosity and excitement to see the final outcome however, that is going to take a while. First, I would like to introduce my partner in crime for this project, Hannah Perkins. Hannah and I have been doing projects together all year and I know that we have the capability of creating the most amazing magazine ever. But I know it will not be easy. There may be some bickering and frustrating days but in the end we make a great team.
For this final project we have decided to embrace the magazine making process. This is exciting but at the same time nerve wrecking. How do you make a magazine aesthetically pleasing for your target audience? What is your target audience? How will you lay out all your information? And the most important question of all: What is the magazine topic ?!?! For the past few weeks this has been the question that dominates my thoughts. This makes me a bit worried because when I begin to overthink a topic, my anxiety takes over and destroys all the progress that I have done. The main thing that I strive to do during these next few weeks is to enjoy the process and not get too stressed because in the end this is MY creation, MY pride and joy.
I have started doing a bit of research on the different types of magazine and I wanted to find one that really appealed to me. The tricky thing about this is that I want to be able to create a magazine that no one has ever seen before or thought of doing. Keeping that in mind these are some of the topics that seem interesting:
-Fashion and style
-Arts and crafts
-Design
-Nature
-sports
I will keep you updated on the topic I choose but this is it... the beginning of the journey.
Subscribe to:
Posts (Atom)